How To Repair a Garage Door Opener: 17 Troubleshooting Tips
Knowing how to repair a garage door opener can help immensely when your garage door opener malfunctions –– whether the door is stuck halfway, making ominous grinding noises, or simply refusing to respond to your commands.
We'll walk you through 17 essential troubleshooting steps to understand how to repair your garage door opener. By following these steps, you can either solve the problem or know when to call professional garage door opener repair services.
Table of contents:
- 1. Disengage the Emergency Release
- 2. Ensure the Motor Is Plugged In
- 3. See If It’s Unlocked
- 4. Check for Obstructions
- 5. Straighten the Sensor
- 6. Clean the Sensor
- 7. Get New Remote Batteries
- 8. Inspect the Keypad
- 9. Reprogram the Remote Control
- 10. Move the Up-Limit Switch
- 11. Adjust the Close-Force Screw
- 12. Make Sure the Door Is on the Track
- 13. Look for Snapped Cables
- 14. Lubricate the Garage Door Rollers
- 15. Replace the Garage Door Rollers
- 16. Replace the Circuit Board
- 17. Examine for Broken Springs
- FAQ
- Same-Day Repairs With Precision Garage Door Service
Step One - Disengage the Emergency Release
The first troubleshooting step when your garage door won't open is to disengage the emergency release. This involves pulling the red cord hanging from the track to disconnect the door from the automatic opener.
If you're able to manually open the door after this step, the issue is likely the opener. However, if manual operation doesn't work, the problem may be elsewhere in the door mechanism.
When manually operating the door, proceed with caution to avoid injury. Keep your hands and fingers away from moving parts, and be mindful of the weight of the door to prevent strain or accidents. If you're unsure or uncomfortable, seek professional assistance instead.
Step Two - Ensure the Motor Is Plugged In
When troubleshooting a nonresponsive garage door opener, the second step is to ensure that the motor is plugged in. A simple oversight, such as accidental disconnection or a power outage, can render the opener inactive. By following the below steps, you can determine whether this is the cause of the problem:
- Locate the power cord connected to the motor unit, usually mounted on the garage ceiling.
- Check whether the power cord is securely plugged into a functioning power outlet — if the cord is unplugged, reconnect it securely.
- Test the opener by trying to operate it.
- Verify that the power outlet receives electricity by testing it with another device.
If the motor remains unresponsive after plugging it in, there may be an underlying issue with the opener that requires further investigation or professional assistance.
Pro tip: When testing the opener, listen for any sounds indicating motor activity, such as a hum or click.
Step Three - See Whether It’s Unlocked
The third important troubleshooting step for a malfunctioning garage door opener is to check whether the door is unlocked. Let’s look at how to check whether the door is unlocked for manual and automatic garage door locks.
Manual lock: Check for manual locks such as slide bolts or padlocks on the garage door tracks or handles. If you find any, use the appropriate key or combination to unlock them. Try operating the opener again afterward to see whether the problem is resolved. If the door is still locked, call professionals to look into it.
Automatic lock: Inspect the door for automatic locking mechanisms, such as bars or bolts along the tracks or handles. If present, consult the door's manual to learn how to disengage them. Test the opener again to check whether the issue is resolved. If not, seek professional assistance. Always prioritize safety to avoid accidents or damage.
Step Four - Check for Obstructions
Is there anything blocking the smooth operation of your garage door? Here’s how to troubleshoot:
- Inspect the tracks on either side of the door for any foreign objects or debris that might obstruct the rollers. Clear out any obstructions carefully to ensure the door can move freely along its path.
- Examine the bottom edge of the door for any objects blocking the door's movement. Remove any items you find lodged beneath the door to prevent damage when it closes.
- Ensure the photo-eye sensors are clean and properly aligned. Dust, dirt, or misalignment can cause the sensors to malfunction, leading to door closure issues.
Step Five - Straighten the Sensor
If your garage door seems to be functioning intermittently, misaligned sensors could be the culprit. Inspect the sensors on each side of the garage door opening. They should be facing each other directly and not tilted or misaligned.
If you notice any misalignment, here's how to align your garage door sensors:
- Gently maneuver the sensors until they are perfectly aligned. Use a level to ensure they are straight both horizontally and vertically.
- Securely tighten the mounting brackets to keep the sensors in place.
- Test the door to confirm that it operates smoothly without interruption.
Step Six - Clean the Sensor
Over time, dust, dirt, and spiderwebs will accumulate on the photo-eye sensors, causing them to malfunction. Gently wipe the sensors with a soft, dry cloth to remove any visible dirt or debris. Do not use harsh chemicals or abrasive materials that could damage the sensors.
After cleaning, verify that the sensors are still properly aligned. Make any necessary adjustments to ensure they face each other directly and are free from obstructions.
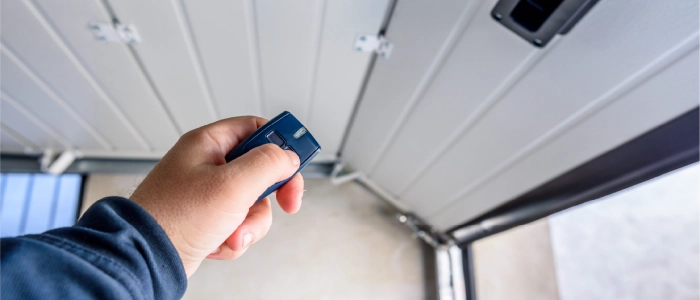
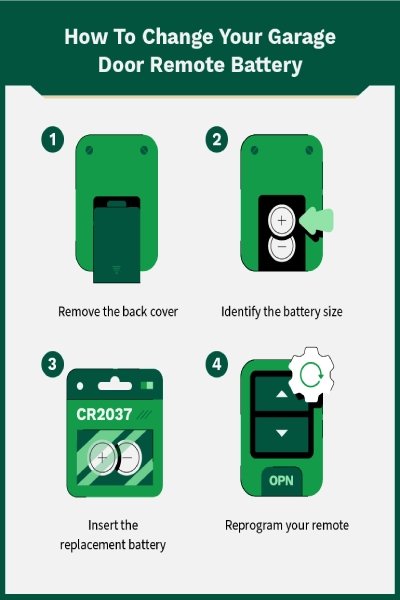
Step Seven - Get a New Remote Battery
If your garage door opener responds inconsistently to remote commands, it could be a simple matter of a dying battery. Try using the transmitter inside your garage. If the door doesn’t open, there’s another problem. If it does open, the batteries in your remote may be depleted.
Replace your batteries with new ones and test the opener's functionality. If it responds as expected, the issue was likely due to dead batteries.
Step Eight - Inspect the Keypad
If your garage door opener includes a keypad for remote entry, inspect the keypad for any signs of damage, wear, or corrosion. Here's what you should do:
- Check whether the buttons are responsive when pressed.
- Replace the batteries with fresh ones if the keypad is battery-operated. Sometimes, weak batteries can cause the keypad to malfunction.
- Ensure the keypad is clean and free from any debris or dirt that might obstruct the buttons or the sensors underneath.
- Verify that the keypad is positioned within the recommended range of the opener for optimal signal reception.
Step Nine - Reprogram the Remote Control
Occasionally, your garage door remote control's programming can become corrupted or disrupted. Refer to the manual for your specific garage door opener for programming instructions. If you have a Precision garage door, you can refer to our guide on how to program a Precision garage door opener remote.
Once the programming is complete, test the remote control to ensure that it operates the garage door opener as intended.
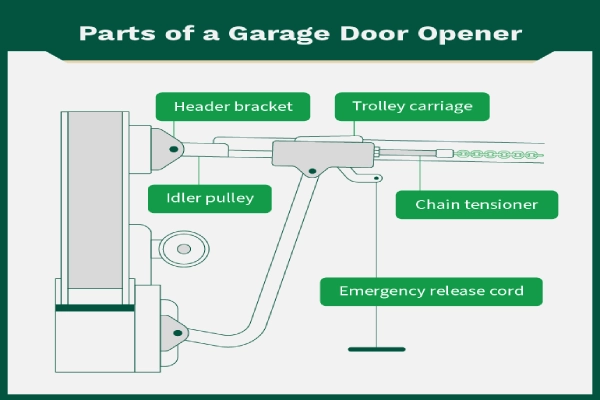
Step Ten - Move the Up-Limit Switch
The up-limit switch on your garage door opener controls how far the door opens. If improperly set, it can cause the door to stop prematurely. Here's how to adjust it:
- Find the up-limit switch on your garage door opener unit. It's usually a small lever or dial near the motor housing.
- Carefully adjust the position of the up-limit switch using a screwdriver or similar tool. Turn it incrementally in the appropriate direction to either increase or decrease the door's opening height.
- Test the door to see whether it opens to the desired height without stopping prematurely. Repeat the adjustment process as needed until you achieve the correct setting.
Step Eleven - Adjust the Close-Force Screw
The close-force screw controls the amount of force exerted by the garage door opener when closing the door. If improperly set, it can cause the door to close too forcefully or not close at all. Here's how to adjust it:
- Find the close-force adjustment screw on the opener unit. It's usually labeled and located near the motor housing.
- Use a screwdriver to turn the screw clockwise to increase the closing force or counterclockwise to decrease it. Make small adjustments and test the door after each turn.
- Close the door and observe its movement. It should close smoothly and without excessive force. If necessary, continue adjusting the screw until you achieve the desired closing force.
Step Twelve - Make Sure the Door Is on the Track
If your garage door seems to be misaligned or struggles to move smoothly, it could be due to the door coming off the track. Ensure that the rollers are securely positioned within the track and that there are no gaps or misalignments.
If you notice any misalignment, you can carefully attempt to manually realign the door by gently guiding it back onto the track or call a professional for help.
Step Thirteen - Look for Snapped Cables
Check to see whether your cables are dangling on the side of your garage or whether the pulley seems bent. A snapped cable or jammed pulley must be replaced by a professional.
Handling snapped cables or jammed pulleys requires specialized knowledge and equipment. Do not attempt to do this on your own. Contact a trained service professional immediately to assess and resolve the problem safely. Attempting to repair or replace cables or pulleys without proper expertise is dangerous and can void your warranty.
If you notice that your emergency release was already disengaged during the inspection process, you can reattach it to the opener by aligning the two trolleys back together. This should automatically snap the emergency release back into place. However, if snapped cables or a jammed pulley are present, addressing these issues promptly and with expert assistance is essential.
Step Fourteen - Lubricate the Garage Door Rollers
Over time, garage door rollers can accumulate dirt and debris, leading to increased friction and noisy operation. Lubricating the garage door rollers is a simple yet effective maintenance task that can prolong their lifespan and ensure smooth operation.
After lubricating the rollers, open and close the garage door several times to allow the lubricant to distribute evenly. Listen for any squeaks or squeals that may indicate areas needing additional lubrication.
Step Fifteen - Inspect the Garage Door Rollers
Check your garage door rollers. If your garage door rollers are rusted, worn out, or making excessive noise despite lubrication, it may be time to replace them. Call a professional to replace your garage door rollers. This isn’t something you want to put off; it's crucial for enhancing the overall functionality and lifespan of your garage door system.
Step Sixteen - Replace the Circuit Board
If your garage door opener is experiencing persistent issues, a faulty circuit board may be the culprit. While replacing the circuit board is more complex than some troubleshooting tasks, it can often resolve recurring problems with the opener.
If you're confident in your abilities and have the necessary tools, you can tackle this task yourself. However, keep in mind that this could void your warranty. For most people, it’s best to enlist the help of a professional.
Step Seventeen - Examine for Broken Springs
Broken garage door springs can cause the door to become unbalanced, making it difficult or impossible to open manually or with the opener. Inspect the springs located above the garage door (torsion) or along its sides (extension), depending on the type of spring system your door uses.
Your spring may be broken if you notice:
- Gaps or irregular spacing between coils in the springs
- Visible gaps or separations in the springs themselves
- Damaged or missing safety cables
- Loud squeaking or banging noises when the door operates
Broken garage door springs must be replaced. This is a dangerous process so do not attempt to replace it by yourself. Call a professional to replace your garage door springs as soon as possible.
FAQ
Do you have more questions about your garage door opener? Find answers to some common questions below.
Why Did My Garage Door Opener Stop Working?
Your garage door opener may have stopped working for various reasons, such as power outages, faulty wiring, or worn-out components. Start troubleshooting by checking the power supply, ensuring the motor is plugged in, and inspecting for any visible damage or obstructions in the mechanism.
How Do I Know Whether My Garage Door Motor Is Burned Out?
If your garage door motor is burned out, you may notice things such as the door not moving despite power being supplied, unusual noises coming from the motor unit, or a burning smell. If you suspect burnout, consult a professional technician for diagnosis and garage door motor replacement.
Why Is My Garage Door Not Responding to the Remote?
If your garage door is not responding to the remote, it could be due to issues with the remote itself, dead batteries, or problems with the opener's receiver. Try replacing the remote batteries first. If the issue persists, check for any obstructions blocking the signal between the remote and the opener, and consider reprogramming the remote if necessary.
Schedule Same-Day Repairs With Precision Garage Door Service
These troubleshooting steps help you repair a garage door opener, but many of these steps are difficult, dangerous, or require specialized tools or knowledge. Save time and money by calling a professional to ensure the job is done right the first time.
At Precision Garage Door Service®, we offer 24/7 same-day repair. Find your local Precision Garage Door Service to find out more.
This article is intended for general informational purposes only and may not be applicable to every situation. You are responsible for determining the proper course of action for your property. Services should be performed by licensed and experienced professionals. Precision Garage Door Service is not responsible for any damages that occur as a result of this blog content or your actions. For the most accurate guidance, contact a Precision Garage Door Service professional for a custom, on-site assessment.